Finchingfield Guildhall

Wednesday 21 December 2011

Final Model Contributions

The final models I have contributed to the group project are:

Shop Cabinet & Desk:
I wanted to give the desk a modern feel to it as the Guildhall is being refreshed, I wanted to give it a modern edge, but still be classy. This is why I went for a circular shape and the glass top. This was simple to make, and I feel it looks very effective.


The cabinet is simply for displaying the items on sale in the shop.


Projector & Screen:

The projector and screen are in the meetings room, for presentations to be held. This was meant to be animated more and the credits were supposed to be shown from the projector onto the screen after the curtains in the room had closed. This was our idea and would haved looked very good. But this wasn't the case as I couldn't get the curtain to close, I managed to get it to open but couldn't reverse the progress. The test can be seen below.

Curtain Test:

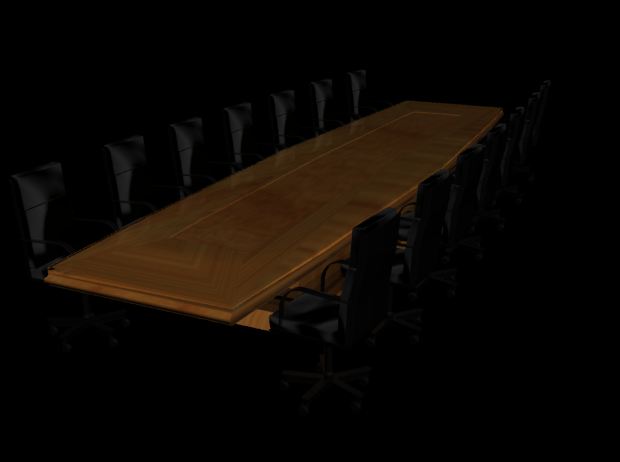
Meetings Table & Chairs:

The meetings table and chairs was supposed to have the same feel as the shop desk, this was to make it feel more smart and classy. This is why I wanted to use the glass effect too, I also got an idea of the shape and style from an image found on google. The chairs were taken from TurboSquid as the chairs that were in originally didn't fit with the feel of the room.

Wednesday 30 November 2011

Mac Computer

For the computer, I just tried to copy the look of the mac computers we have in the labs. the shapes weren't too difficult. Making the curves at the top of the tower system were the most difficult, but I extruded parts of the top of the tower, then chamfered the corners to smooth them out. Then I used the inset tool to then extrude the inside of the end faces. I also had to create new edges around using the swift loop tool, this was helpful when creating the disk drives and the usb ports. Yes, too much detail for an object that won't have much attention drawn to it, but it made it look better.

To make the screen, I used a box, chamfered the corners and used the inset tool again, this gives the black boarder effect. For the stand, I used the inset tool again making the poly smaller, I then extruded this, rotated the face again and extruded once more and modified the shape to make it as close to reality as possible.


The keyboard is simply a box, modified in shape slighty with the image of a keyboard used as the texture.  The textures of the screen and tower are a brushed metal texture, this makes them look ok, but not as realistic as I would like.

Glass Walkway

For the glass walkway, I found it a nice shape to be able to make, I followed the shape of the base, it looked kind of like a conservatory to me, so I kept that in mind as well as the artist's impression images of what it will end up looking like. I like the way that it is so open and looks out onto the outside. This made it simple to create as there was mainly glass and only a few wooden frames to hold the glass in place.

I found the simple shape of the door handle quite easy to create too, this was simply because I used a cylinder and made one end thinner, and rotated the opposite end to make it curve, then extruded parts of the rotated end to make the part of the handle where it is attached to the door.


Below is a comparison between the model I have created and the artist's impression.


I think the texture of the brick wall could do with some work as the bricks seem an orange colour in the drawing and a dark colour in my render. This will be looked into at a later date.
 

Plaques inside Walkway

In the walkway, there are a few plaques on the wall with the noticeboard, this was simple to recreate these as I simply made the shapes that they are meant to be, and added the texture materials. This didn't take long.

 These look very good I feel, I think they look nice and realistic enough for a brief view of them when in the animation. I will modify the textures and make them less reflective and shiny to make them look more dated.


For this plaque, I made several attempts to give the effect of the text being engraved into the wood. This wasn't too difficult to learn, but any time I would try to subtract the text from the box, there would be edges that were created all over the place and would randomly subtract through the text into the corners of the base box. So again, I just simply used the texture again and I will also try to make this look more dated.

Monday 28 November 2011

Sofa and Armchair for the Library

For the sofa and armchair, I simply used a couple of boxes. I used a longer one for the sofa, I gave it a series of length segments and then extruded the middle polys. This gave a simple idea of the shape, then I used the chamfer tool on the arms and around the edges that do not normally tend to be so sharp, this gave a nice simple smoother effect for the chairs. For the big seat cushions, I just used two more boxes, each with only one segment all round to give the file less polys. Again, I used the chamfer tool on certain edges of the boxes to give a softer look. The textures will be placed once the files are all in together.


Friday 25 November 2011

Sink & Draining Board


For the sink and draining board, I first made the bowl for the sink, this was simply a single box with the corners chamfered. This gave the impression of a round sink shape.

I copied the same shape before I extruded the top part, this was to be the correct shape for the draining board, for the sink, I inset the top poly, then I moved the poly down to make a bowl shape. Then I inset again and made the poly into a small circular shape to make this the plughole. I then chamfered the edges of the rim to make the sink have a nicer feel about it.

To make the draining board I made a cylinder and made it very thin, this have a slight bump effect when put into the base shape, I felt that this was, although simple, very effective.


To make the tap, I made a tube shape, and modified it into a curved shape by rotating different series of vertexes, then I made a cone to be the base of the tap. Then I copied the cone shape twice and made them smaller, this then was put onto the left and right sides of the original cone, this is to make the tap shape. To make the taps, I simply extruded the polys on the top at either end, this gives the effect of a modern tap. I will make an older style one if there is more time before production.

Toilet

I am currently just thinking of making all the small parts of the house that we will need to have in place just to make the house look relatively normal with all the necessary appliances.

Next in the line of production was a toilet. I used a cylinder to start with and made it into a roudh cone shape but slightly distorted, I should really have used a cone to make life easier but it seemed easier this was to start with. As I made the shape of the bowl, the whole shape came together, I used the inset tool to give the bowl a rim, Then I used the extrude tool, I used it to create the seat and the system of the toilet. To make the seat, I extruded a few polys from the top of the bowl, not all the way round because this wouldn't have given me any gap and would not have looked as convincing. I did the same for the top seat, I also extruded the same polys outwards as to create the same type of shape as the top of the bowl. For the system, I extruded a few polys at the back of the bowl and extruded them out and up. I kept this shape as the shape for the system as I felt this looked quite realistic.

Also, for the pipe heading from the system to the bottom of the toilet bowl, I curved a cylinder shape and deleted certain polys in the bottom of each the toilet and the system, I then simply attached and welded the vertexes together.